thread
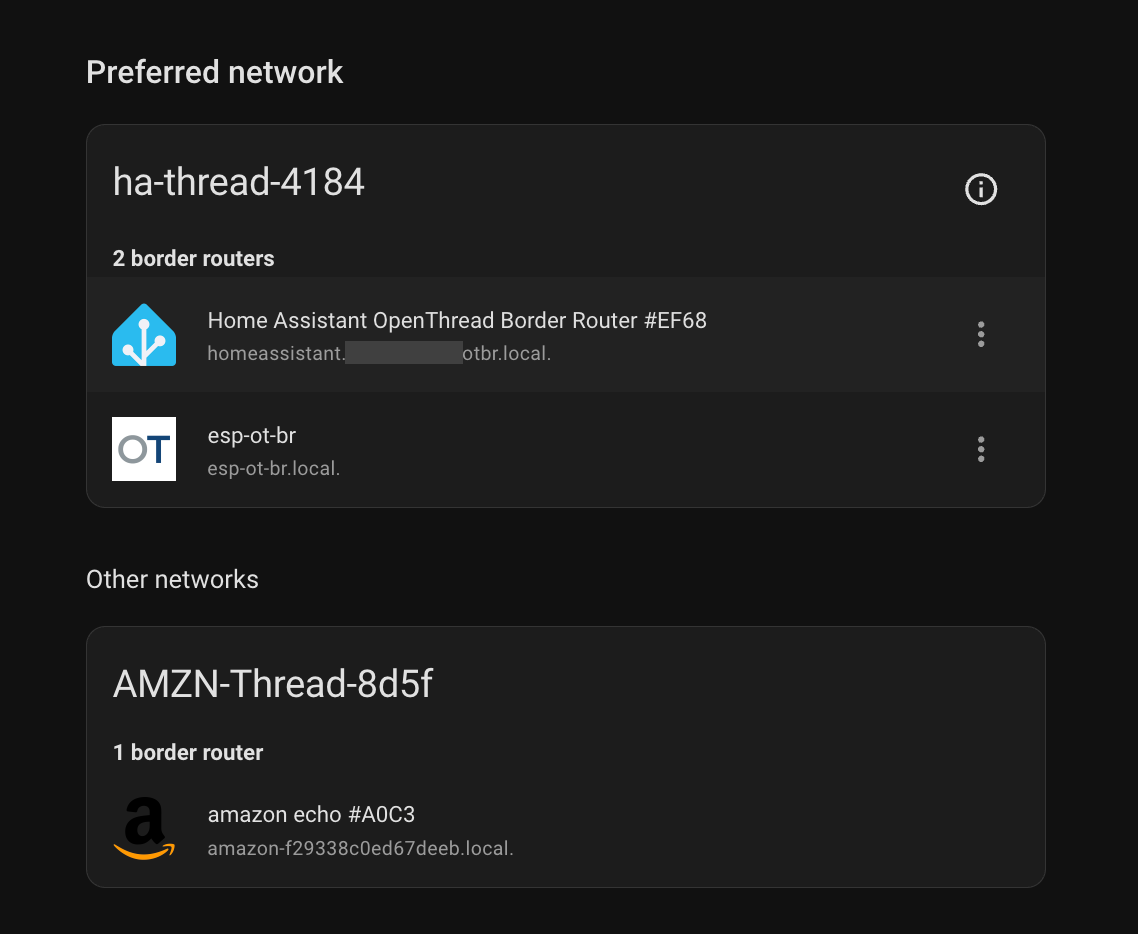
one Thread network, owned by Home Assistant, with two border routers: Home Assistant's OpenThread Border Router add-on, using a SkyConnect that sits on the pi and is reached over the network, and an Espressif ESP Thread Border Router board. Matter over Thread devices join it from Home Assistant.
this page is the network as a whole: how it is set up, how it recovers when the pi goes away, the ESP board, and how to check it is all one mesh. versions it was checked against: Home Assistant Core 2026.9, Supervisor 2026.09, OpenThread Border Router add-on 3.1.
the network
let Home Assistant own it. Home Assistant creates the dataset (network name
ha-thread-xxxx, channel, PAN ID, extended PAN ID, mesh-local prefix, network
key, PSKc) and keeps it as the preferred network. every border router gets that
dataset, none forms its own. when i ran the border router in a container i spent
a long time making the network use a name i picked, and Home Assistant kept
wanting to manage the name. not worth it.
the dataset is under Settings > Devices & services > Thread, the (i)
on the preferred network. Active dataset TLVs there is the whole network,
network key and PSKc included. anyone with the key and a radio in range can join,
so treat that string like a password: not in chat tools, not in an sdkconfig,
not in git.
border routers and routers
two different things, which confused me for a while:
- a border router connects the mesh to the LAN. the Thread panel lists these, found by their mDNS announcements
- a router is a role inside the mesh. mains powered devices (plugs, bulbs) take it too and relay traffic for the rest. they are not border routers and are not in that panel
mine has three routers, two of which are border routers. the third, a mains powered device, is currently the leader.
| border router | radio | link to the LAN |
|---|---|---|
| OpenThread Border Router add-on, on the Home Assistant VM | SkyConnect on the pi, through ser2net | the VM's network |
| ESP Thread Border Router board with Espressif's Ethernet daughter board | its own ESP32-H2 | Ethernet, powered over PoE |
other networks
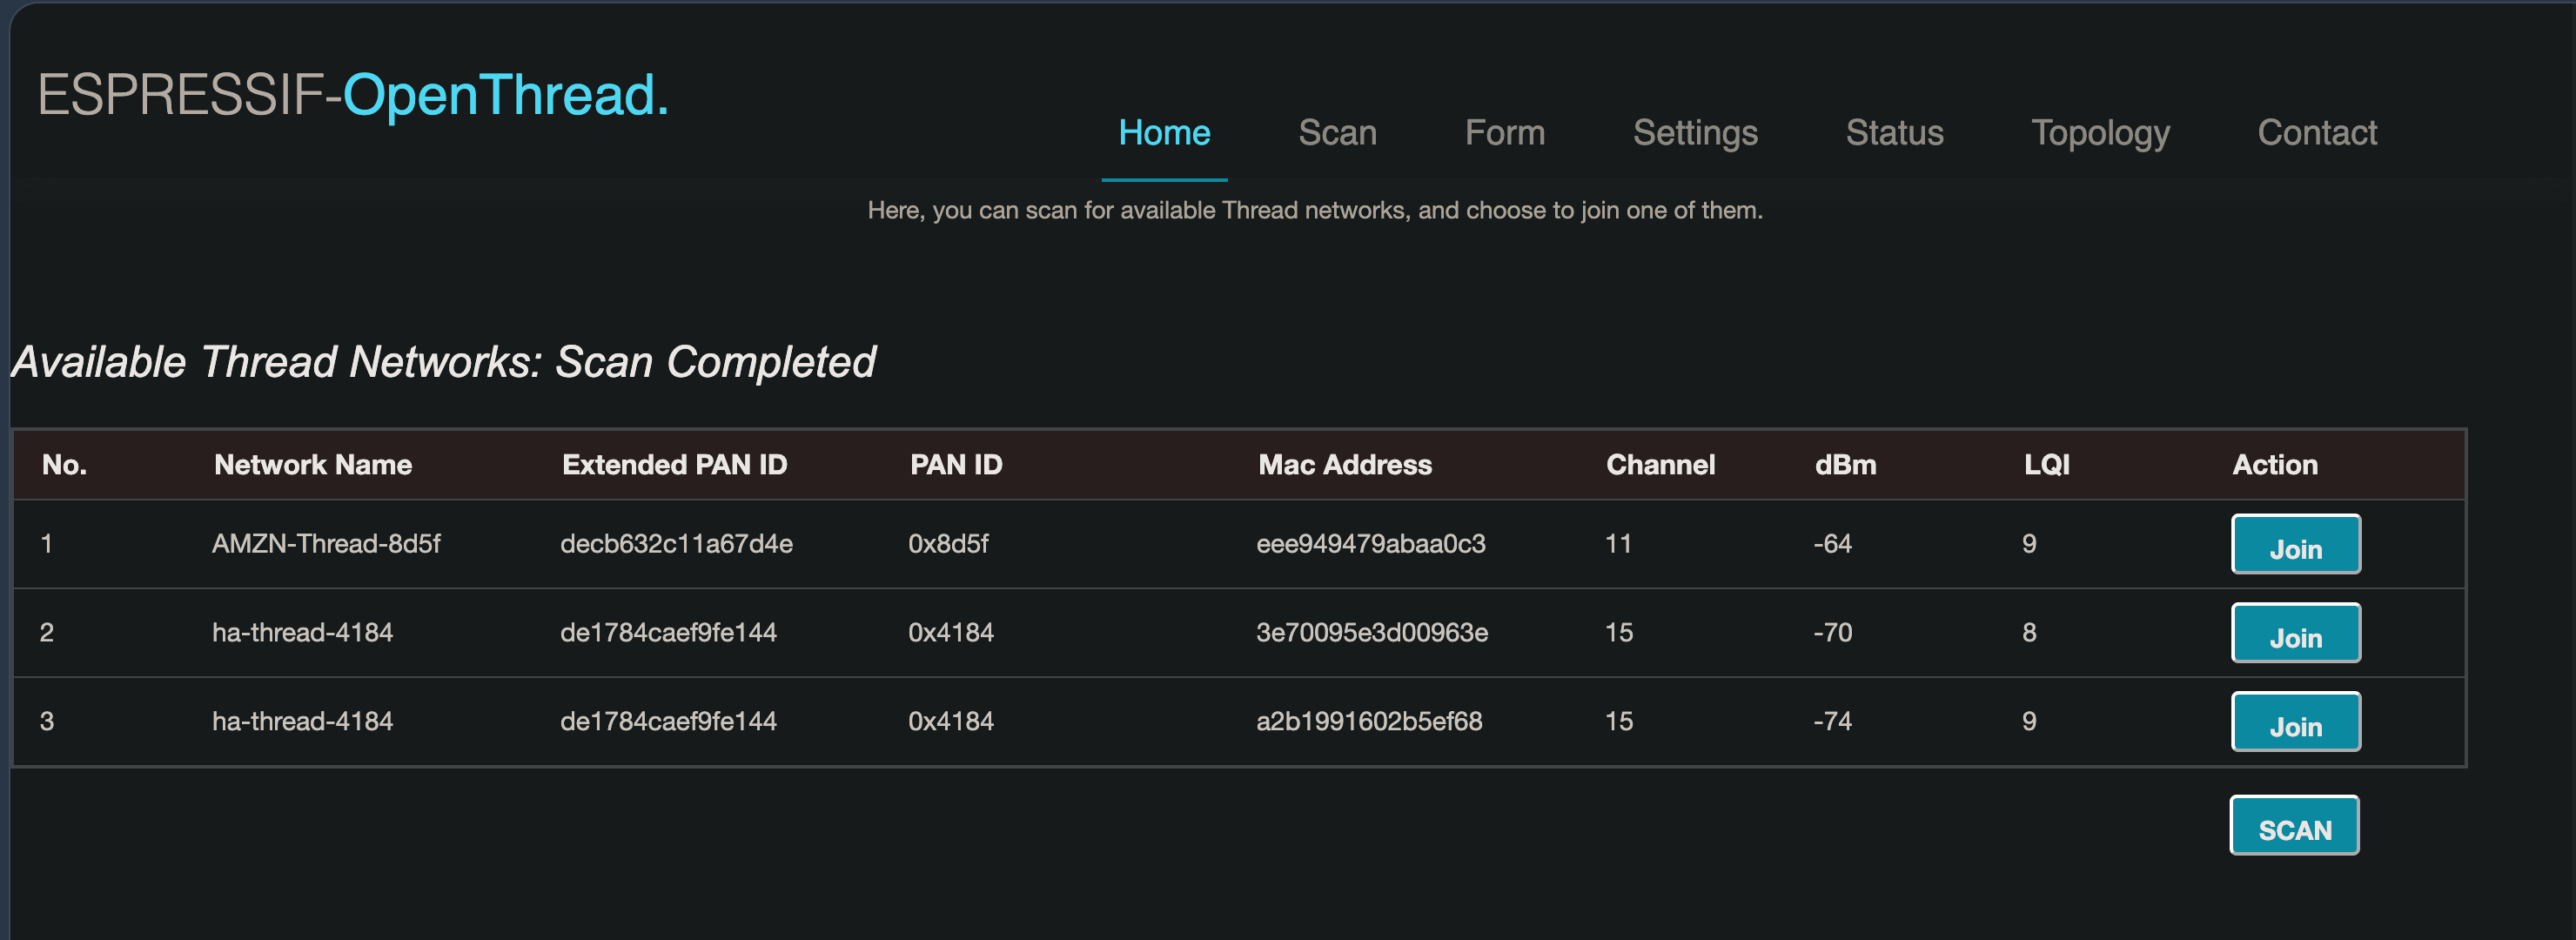
an Amazon Echo with Thread in it forms its own network, and the panel shows it under Other networks. it cannot join this one: Amazon keeps the Echo's Thread credentials in the Amazon account and has no setting to join a different network, and Home Assistant has no way to get Amazon's key either. i leave it alone. it runs on a different channel.
to use a device from Alexa as well, add it to Home Assistant first so it joins this network, then Settings > Connectivity > Matter > Devices > the device > Share device, and enter the code in the Alexa app. Alexa then reaches it over the LAN through these border routers.
why the radio is on the pi
the full back and forth, including the working compose files, is in openthread discussion #10311. short version:
- 2024,
openthread/otbrcontainer on the pi. that image is meant for development. without a volume for/var/lib/thread, a recreated container came back without its network, and Home Assistant only picked it up again after removing and re-adding the OTBR integration - 2024, ser2net on the pi and the add-on in Home Assistant. reliable
- 2025,
openthread/border-routercontainer, the image meant for deployment, with host networking and a/datavolume. it kept its network, but commissioning needed reboots and retries, Home Assistant did not discover it, and restarting it made me nervous - after the pi was rebuilt, back to ser2net and the add-on
the cost, from the add-on's own documentation: the radio protocol expects a UART, not TCP. it is timing sensitive, and when the TCP link fails the border router does not shut down cleanly, which can leave stale routes for up to 30 minutes even with other routers available. the second border router covers routing while the add-on is down, it does not make that warning go away.
the ser2net side is on the pi page.
the add-on's settings: network device is 192.168.1.96:8000, device is
any serial port (it is required and not used), flow control on.
when the pi goes away
what happens, seen when i powered the pi off to fit a GPS antenna:
otbr-agentloses the radio, tries to recover twice, and exits. the add-on treats that as permanent and stops its container- with Watchdog on, Supervisor starts it again. before the border router starts, the add-on migrates its settings, which needs the radio, so with the pi gone each start fails in about 10 seconds
- Supervisor allows 10 watchdog restarts in 30 minutes. at 10 seconds each that is used up in about two minutes, and the add-on then stays stopped
in the add-on log, No route to host from socat means the whole pi is
unreachable. Connection refused means the pi is up and ser2net is not.
so: Watchdog on, for short drops such as a ser2net redeploy, and an automation for anything longer.
the automation
two things it needs:
- the add-on's Running sensor. Settings > Devices & services > Home Assistant Supervisor > the OpenThread Border Router device > enable Running. it is off by default
- a Ping (ICMP) integration for the pi's address
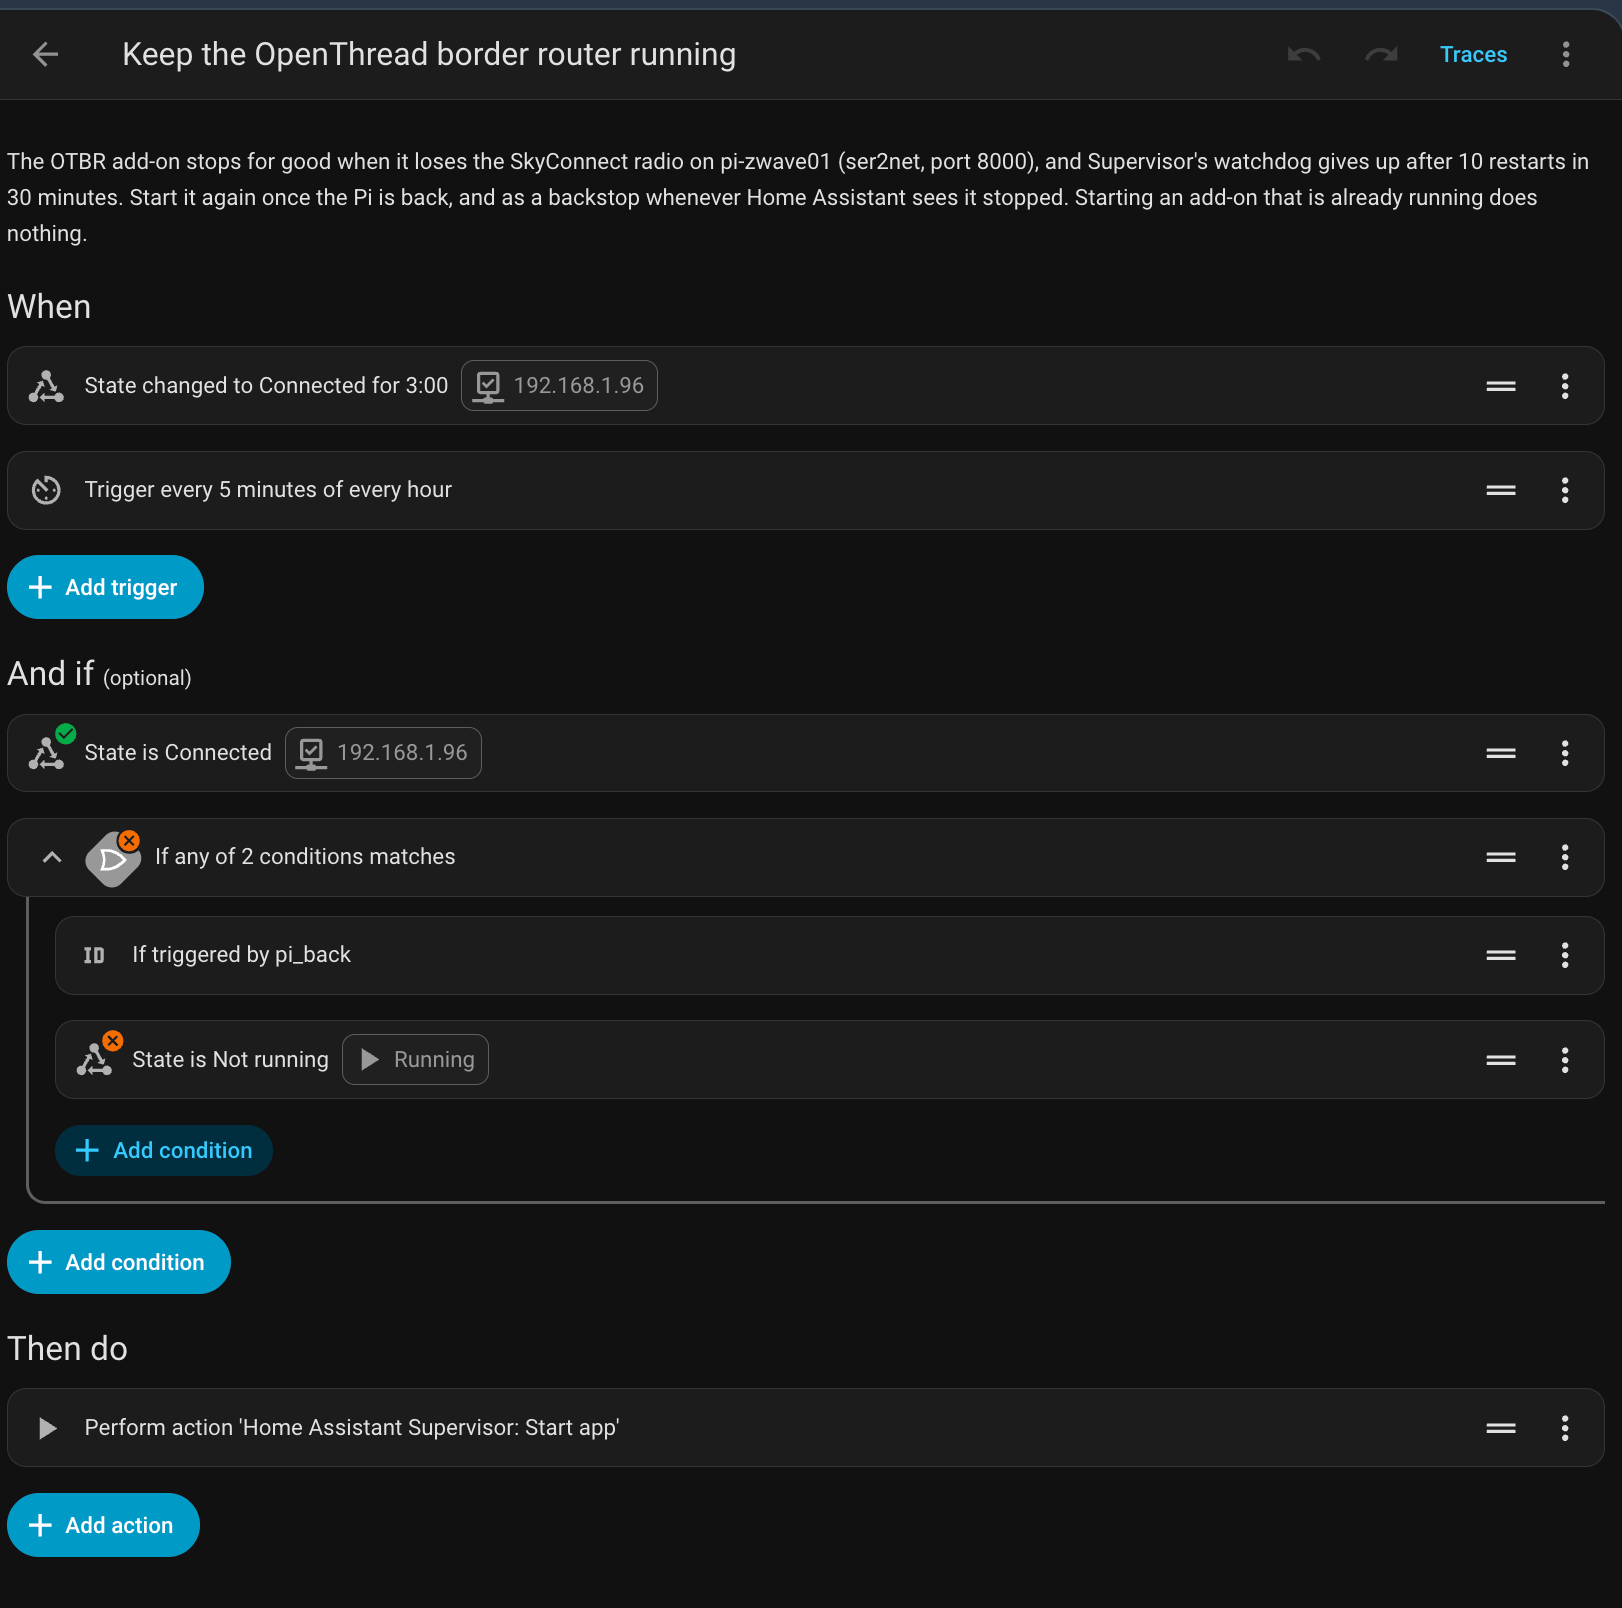
alias: Keep the OpenThread border router running
description: >-
  The OTBR add-on stops for good when it loses the SkyConnect radio on the pi
  (ser2net, port 8000), and Supervisor's watchdog gives up after 10 restarts
  in 30 minutes. Start it again once the pi has answered pings for 3 minutes,
  and as a backstop whenever Home Assistant sees it stopped. Starting an
  add-on that is already running does nothing.
triggers:
  - trigger: state
    entity_id: binary_sensor.192_168_1_96
    to: "on"
    for:
      minutes: 3
    id: pi_back
  - trigger: time_pattern
    minutes: "/5"
    id: periodic
conditions:
  - condition: state
    entity_id: binary_sensor.192_168_1_96
    state: "on"
  - condition: or
    conditions:
      - condition: trigger
        id: pi_back
      - condition: state
        entity_id: binary_sensor.openthread_border_router_running
        state: "off"
actions:
  - action: hassio.app_start
    data:
      app: core_openthread_border_router
mode: single
change the two entity IDs to whatever yours are called.
| part | why |
|---|---|
| ping on for 3 minutes | the pi answers ping before Docker has started ser2net |
| every 5 minutes while Running is off | the backstop. the Supervisor integration refreshes add-on state every 15 minutes and nothing pushes it sooner, so this path is slow |
| the pi answering ping, as a condition | no start attempts while the pi is down |
hassio.app_start |
starting an add-on that is already running does nothing, Supervisor only logs that it is already running. a stale Running sensor cannot cause a restart |
to test the action: stop the add-on, then in the automation ⋮ > Run actions, which skips the triggers and conditions. Thread devices should keep working while it is stopped, through the ESP. to test the whole automation, follow watching a failover.
if you stop the add-on on purpose, turn the automation off first, or it starts the add-on again within a few minutes.
in the automation editor each condition shows a live badge, a tick when it is true right now and a cross when it is not. with everything healthy, Running is off shows a cross, which is what you want.
what i did not use:
- a TCP sensor on port 8000. ser2net has
kickolduser: true, so a probe from Home Assistant's address would kick the add-on off the radio every time it ran - Home Assistant's Portainer integration, which does have a container health sensor. it wants a token from a Portainer admin and adds, for every environment, prune volumes buttons, recreate with image pull, and stack on/off switches. that is a lot of control for a readiness check, and recreate with pull goes around the deploy branches
alerts
two, to the Home Assistant app. the first is immediate and says recovery happened, the second is the catch-all.
-
notify when the automation starts the add-on because the pi came back. add to its
actions, afterhassio.app_start:- if: - condition: trigger id: pi_back then: - action: notify.mobile_app_<your phone> data: title: Thread border router message: the pi is back, started the OpenThread border router add-onon that trigger only. the 5 minute backstop path would notify again every 5 minutes while the Running sensor is still stale
-
a second automation, for a stop the first one does not fix:
alias: Alert when the OpenThread border router add-on stays stopped triggers: - trigger: state entity_id: binary_sensor.openthread_border_router_running to: "off" for: minutes: 20 actions: - action: notify.mobile_app_<your phone> data: title: Thread border router message: >- the OTBR add-on has been stopped for 20 minutes. Thread still works, the ESP is a border router too mode: single -
Home Assistant refreshes add-on state every 15 minutes (
HASSIO_ADDON_UPDATE_INTERVAL) and nothing pushes it sooner, so those 20 minutes can be 35 in real time. this is an alert, not an alarm - it fires when you stop the add-on yourself too. to mute that, add an
input_booleanhelper as a condition on both automations, and create the helper first: a condition on an entity that does not exist is false, so nothing would fire at all - neither alert catches the add-on running but not carrying the radio. i have not found a signal for that which does not disturb the radio link
the ESP border router
| hardware | Espressif ESP Thread Border Router/Zigbee Gateway board: ESP32-S3 host, ESP32-H2 radio co-processor, UART between them |
| backbone | Ethernet, on Espressif's Sub-Ethernet daughter board (W5500, 10/100), built with CONFIG_EXAMPLE_CONNECT_ETHERNET. the main board alone is Wi-Fi only. i wanted this border router as reliable as i could make it, so no Wi-Fi |
| power | PoE, through an external splitter. Espressif lists 5 V over either USB-C port as the board's only power input, and neither board has PoE |
| firmware | esp-thread-br basic_thread_border_router, built from main at 46d36d3 on ESP-IDF v5.5.4 |
what you need
| part | what for |
|---|---|
| ESP Thread Border Router / Zigbee Gateway board | the border router: ESP32-S3 host, ESP32-H2 radio |
| Sub-Ethernet daughter board | the wired backbone. it stacks on the main board's headers |
| 802.3af PoE splitter with 5 V out | one cable to the board: Ethernet for the daughter board, 5 V for the board |
| a barrel to USB-C lead | the splitter's DC output into a USB-C port |
| a USB-C data cable | flashing, from your computer. charge-only cables will not enumerate |
| a printed case | optional. fits the two boards stacked, with the Ethernet socket out the side |
the two USB-C ports are USB1 (the H2) and USB2 (the S3). both feed the board through diodes, so power on one and your computer on the other at the same time is fine. mine keeps power on USB1 and leaves USB2 for flashing.
build and flash it
the board arrives blank: it does nothing until you flash Espressif's
basic_thread_border_router example onto the S3. the H2 gets its radio firmware
from the S3 on first boot, so you only flash one of them.
-
install ESP-IDF's prerequisites, from Espressif's setup guide for your OS. run their commands, not a summary of them:
-
Linux, Debian and Ubuntu:
sudo apt-get install git wget flex bison gperf python3 python3-pip python3-venv cmake ninja-build ccache libffi-dev libssl-dev dfu-util libusb-1.0-0also add yourself to the
dialoutgroup (uucpon some distributions), or flashing fails with a permission error on the port -
macOS:
brew install cmake ninja dfu-util ccache. ESP-IDF uses the system python3 -
Windows: the ESP-IDF Windows installer, which is the supported path rather than WSL. its ESP-IDF PowerShell shortcut sets the environment up for you, but for the tree the installer manages. so either:
- pick v5.5.4 in the installer, use that shortcut, and skip the
esp-idfclone in the next step, or - clone as below and activate that clone yourself, in PowerShell:
.\esp-idf\install.ps1 esp32s3,esp32h2then. .\esp-idf\export.ps1
get this wrong and
idf.pyruns against a different ESP-IDF from the one you built the radio firmware in - pick v5.5.4 in the installer, use that shortcut, and skip the
-
-
get both trees. on Windows that is
install.ps1in PowerShell, orinstall.batin the Command Prompt. everyidf.pybelow runs in a shell where you have sourced the matchingexportscript for this tree, unless you let the installer manage it -
put your settings in a second defaults file rather than editing anything. mine,
sdkconfig.esp-ot-brinesp-thread-br/examples/basic_thread_border_router:CONFIG_EXAMPLE_CONNECT_ETHERNET=y # CONFIG_EXAMPLE_CONNECT_WIFI is not set CONFIG_OPENTHREAD_BR_AUTO_START=y CONFIG_OPENTHREAD_BR_START_WEB=y CONFIG_OPENTHREAD_COMMISSIONER=y CONFIG_OPENTHREAD_JOINER=y CONFIG_OPENTHREAD_RADIO_STATS_ENABLE=y CONFIG_OPENTHREAD_TIME_SYNC=y CONFIG_OPENTHREAD_PACKAGE_NAME="openthread-unit1"the radio link is already the board's defaults, nothing to set:
CONFIG_PIN_TO_RCP_TX=17
CONFIG_PIN_TO_RCP_RX=18
CONFIG_PIN_TO_RCP_RESET=7
CONFIG_PIN_TO_RCP_BOOT=8
CONFIG_AUTO_UPDATE_RCP=y
with
AUTO_UPDATE_RCPthe S3 flashes the H2 with the radio firmware it was built with, over the reset and boot pins -
give the board a name of its own. Espressif's code sets the same name,
esp-ot-br, on every board, so a second one answers to the sameesp-ot-br.localas the first. one line inmain/esp_ot_br.cnames it after its own MAC instead, the way the firmware already names the network it forms:uint8_t mac[6]; char hostname[32]; ESP_ERROR_CHECK(esp_read_mac(mac, ESP_MAC_BASE)); snprintf(hostname, sizeof(hostname), "esp-ot-br-%02x%02x", mac[4], mac[5]); ESP_ERROR_CHECK(mdns_hostname_set(hostname));add
#include "esp_mac.h"at the top, and replace the line that readsmdns_hostname_set("esp-ot-br"). this renames the web UI, the REST API and the name Home Assistant shows, and it is a change to Espressif's code, so re-apply it at each firmware updatemine came out as
esp-ot-br-33f0.local, and every example on this page uses that name. yours ends in your own four characters, which the board prints on the console at boot and shows in the web UI. skip this step and it staysesp-ot-br.local -
build. the radio firmware goes first, the border router build packs it into its
rcp_fwpartition. Linux and macOS:cd "$IDF_PATH/examples/openthread/ot_rcp" && idf.py set-target esp32h2 && idf.py build cd ~/esp-thread-br/examples/basic_thread_border_router && export SDKCONFIG_DEFAULTS="sdkconfig.defaults;sdkconfig.esp-ot-br" && idf.py set-target esp32s3 && idf.py buildin the ESP-IDF PowerShell, where
exportdoes not exist and&&only works in PowerShell 7:cd "$env:IDF_PATH\examples\openthread\ot_rcp" idf.py set-target esp32h2 idf.py build cd $HOME\esp-thread-br\examples\basic_thread_border_router $env:SDKCONFIG_DEFAULTS = "sdkconfig.defaults;sdkconfig.esp-ot-br" idf.py set-target esp32s3 idf.py buildIDF_PATHis set by theexportscript, or by the installer's shortcut on Windows, and points at whichever ESP-IDF you activated. using it means these commands work whether that tree sits besideesp-thread-bror wherever the installer put it- the second
cdis wherever you clonedesp-thread-br - the chaining is not decoration:
idf.py set-targetclears the build directory, so acdthat failed means the next command wipes the radio firmware build. on Windows, check each command worked before the next
-
plug your computer into USB2 and flash. the S3 appears as a USB serial device:
/dev/ttyACM0on Linux,/dev/cu.usbmodemXXXXon macOS,COM4or similar on Windows. no driver needed, it is the chip's own USB -
first boot takes about 15 seconds: the S3 flashes the H2 with the radio firmware, restarts, brings up Ethernet, and serves its web UI at
http://esp-ot-br-33f0.local.idf.py -p <port> monitorshows it, and restarts the board when it connects
it does not join anything by itself. with no dataset stored it forms its own
network, ESP-BR-xxxx after its MAC, on a random channel, and becomes leader of
it. that is expected, and the next section moves it onto yours.
get it onto your network
Home Assistant can push your network onto the board, which is much better than copying dataset TLVs around by hand. the panel only offers it for a border router it manages, so add it to the integration first.
- Settings > Devices & services > Add integration > OpenThread
Border Router, URL
http://esp-ot-br-33f0.local. port 80, a standard border router uses 8081 - rename both entries, ⋮ > Rename. the one you add by URL is always called
Open Thread Border Router, the add-on's takes the add-on's name, and
otherwise they differ by one space. mine say
(ESP32)and(add-on + ser2net). to tell them apart, ⋮ > Download diagnostics, the URL is in the JSON - Settings > Devices & services > Thread. the board shows under its
own
ESP-BR-xxxxnetwork. on its row, ⋮ > Add to preferred network - the dialog says Home Assistant will join an existing Thread network. Any devices that are currently joined on this Home Assistant Thread network will need to be re-joined. it reads backwards: it pushes your preferred dataset onto the board. the devices it means are the ones on the network the board is leaving, which is its own empty one. OK
-
it attaches as a child and is a router a minute or two later
-
the empty
ESP-BR-xxxxnetwork is left behind in the panel. delete it with the bin icon on its card -
do not press Make preferred network on the
ESP-BR-xxxxcard. that promotes the board's own network instead of moving the board - adding the integration only reads: Home Assistant fetches the active dataset and stores it, and writes nothing to the board until you ask it to
- Create network on a border router factory resets it first. that is the one action never to use on a working one
- entries are matched on the border agent ID. a firmware update keeps that ID, so the entry survives one, but an erase changes it and you delete and re-add
- if Home Assistant cannot resolve the name, use the address, and give it a DHCP reservation first
web UI and REST API
- web UI:
http://esp-ot-br-33f0.local/ http://esp-ot-br-33f0.local/.well-known/thread/esp-br-restlists the API-
REST API, the same shape as OpenThread's own border router:
curl -s http://esp-ot-br-33f0.local/node/state; echo curl -s http://esp-ot-br-33f0.local/node curl -s http://esp-ot-br-33f0.local/diagnostics curl -s http://esp-ot-br-33f0.local/topology/node/stateanswers"disabled","detached","child","router"or"leader". in/nodethe same thing is a number, 0 to 4 in that order - the answers are not shaped alike:/topologyand/ipaddrwrap theirs in aresultfield, while/diagnosticsis a bare array and/nodea bare object. sojqneeds.result[]for the first two and.[]for/diagnostics- a path it does not know returns HTTP 200 with a 404 error in the body, so read the body, not the status code - the OpenThread console is on USB, the S3's USB-C port, not on the network. its commands need anotprefix (ot state). plainidf.py -p /dev/cu.usbmodemXXXX monitorrestarts the S3 when it connects;--no-resetis meant to stop that, which i have not tried
there is no authentication. anyone on the LAN can read the dataset, network key
included, from /node/dataset/active, read the PSKc from the web UI's
/get_properties, stop Thread, or make it join or form another network. i accept
that on my LAN. if you do not, build with CONFIG_OPENTHREAD_BR_START_WEB off and
use the USB console.
joining it by hand
the panel does this for you. by hand is for when it cannot: no Home Assistant, or a border router it does not manage.
first, things that do not work, or not the way you would expect:
- the menuconfig dataset (Component config > OpenThread > Thread
Operational Dataset) is ignored. with nothing stored the board forms its own
ESP-BR-xxxxnetwork instead - Join in the web UI once started from a random new network and copied in only the channel, PAN ID and key, leaving the name, extended PAN ID and mesh-local prefix random. this build has the fix, but i have not used it
- Form in the web UI makes a new network
a board that attaches but stays a child has a dataset that differs from the network's, usually in the mesh-local prefix. with the same active timestamp on both, it never takes the network's copy, and pushing the dataset is what fixes it.
check what it has. jq picks out four fields, so the key is never printed:
curl -s http://esp-ot-br-33f0.local/node/dataset/active | jq '{NetworkName, Channel, MeshLocalPrefix, ActiveTimestamp}'
in Home Assistant's Active dataset TLVs, the mesh-local prefix is the 16 hex
characters after 0708 (type 7, length 8). if they differ, push the dataset.
the point of going through the clipboard is that the network key never lands in
shell history or a file. steps 1, 2 and 4 differ per platform and i only run the
macOS ones. in Windows PowerShell 5.1, which is what the installer's shortcut
opens, curl is an alias for Invoke-WebRequest rather than curl itself, so
-s, -o, -w and -X are not understood: call curl.exe for the reads, and
use the Invoke-RestMethod lines below for the writes. PowerShell 7 dropped that
alias, so there curl is the real thing.
-
stop Thread. it only takes a new active dataset while stopped. expect
200curl -s -o /dev/null -w '%{http_code}\n' -X PUT -H 'Content-Type: application/json' -d '"disable"' http://esp-ot-br-33f0.local/node/statePowerShell, which throws on anything but a 2xx rather than printing a code:
-
copy Active dataset TLVs from Home Assistant, then send it from the clipboard and overwrite the clipboard. expect
200. macOS:pbpaste | tr -d '[:space:]' | curl -s -o /dev/null -w '%{http_code}\n' -X PUT -H 'Content-Type: text/plain' --data-binary @- http://esp-ot-br-33f0.local/node/dataset/active pbcopy < /dev/nullLinux over ssh, with no desktop and so no clipboard.
read -rstakes the paste without echoing it, andreadis a shell builtin, so the key is not in the history, not in a file and not in the process list:read -rs TLV printf '%s' "$TLV" | tr -d '[:space:]' | curl -s -o /dev/null -w '%{http_code}\n' -X PUT -H 'Content-Type: text/plain' --data-binary @- http://esp-ot-br-33f0.local/node/dataset/active unset TLVpaste at the blank line and press Enter.
-sis bash and zsh; on a shell without it the paste is echoed, which is only a shoulder-surfing problemPowerShell, where
trandpbcopydo not exist.-Rawmatters: without itGet-Clipboardhands back one string per line, and the PUT then carries an array rather than the dataset.Set-Clipboardwill not take an empty string, so overwrite it with a space:$tlv = (Get-Clipboard -Raw) -replace '\s', '' Invoke-RestMethod -Method Put -ContentType 'text/plain' -Body $tlv -Uri http://esp-ot-br-33f0.local/node/dataset/active Set-Clipboard -Value ' 'the values in the TLVs replace the stored ones
-
run the check above. the mesh-local prefix should now match
-
start Thread
curl -s -o /dev/null -w '%{http_code}\n' -X PUT -H 'Content-Type: application/json' -d '"enable"' http://esp-ot-br-33f0.local/node/statePowerShell:
-
after two or three minutes
/node/stateshould say"router". if it sits at"detached", power cycle the board, it starts from the stored dataset
firmware updates
same build as above, with three differences.
- keep the old tree. clone the new ESP-IDF and esp-thread-br into new directories, so the build you are running now is still there
-
back up the flash before writing anything
- the
&&stops the flash if the backup fails. in PowerShell run the two separately and check the backup exists first - the backup takes about 12 minutes and holds the network key, keep it out of
git. the way back is
esptool.py write_flash 0with it, which i have not needed
- the
-
never
idf.py erase-flash. a normal flash keeps the dataset, the border agent ID and the board's place in the network. an erase loses all three, and you start again at get it onto your network
then /node/state should say "router" within a couple of minutes and the
dataset check should still match Home Assistant.
main's default partitions need the 8 MB board, its app partitions are 2M each.
nvs, where the dataset is stored, does not move.
/diagnostics and /topology do not return NetworkData, Connectivity,
MACCounters or ChannelPages, so network data comes from the USB console, see
what each border router publishes.
checking it is one mesh
the ESP's API
one entry per router, with its extended address, Rloc16 and links. the router
ID is Rloc16 divided by 1024. a child's Rloc16 has a non zero remainder.
LeaderData.PartitionId should be the same in every entry.
mDNS
every border router announces _meshcop._udp:
dns-sd is macOS. on Linux the same two are avahi-browse _meshcop._udp and
avahi-browse -r _meshcop._udp. most TXT values are binary, so both print them
garbled.
| key | what it is |
|---|---|
nn |
network name |
xp |
extended PAN ID. Home Assistant groups border routers into a network by this |
pt |
partition ID, a random number picked by the leader and only announced once attached. the same pt on two border routers means one mesh |
sb |
state bitmap. bits 0 to 2 connection mode, 3 to 4 Thread interface (2 is active), 7 backbone router active, 8 backbone router primary, 9 to 10 role (1 child, 2 router, 3 leader), 11 ePSKc supported |
omr |
the routable prefix the border router favours for Thread devices |
at |
active dataset timestamp |
tv, vn, mn |
Thread version, vendor, model |
my ESP's firmware fills sb, omr and at differently from OpenThread's own
border router: no role bits, and its own prefix in omr. i read its role from the
REST API, not from mDNS.
decode the TXT records with python
no packages needed. it sends one mDNS query for each instance name and prints the fields above.
import socket, struct, sys, time

def qname(n):
    return b"".join(bytes([len(p)]) + p.encode() for p in n.split(".")) + b"\0"

def read_name(buf, off):
    end = None
    while buf[off]:
        if buf[off] & 0xC0 == 0xC0:
            end = end or off + 2
            off = ((buf[off] & 0x3F) << 8) | buf[off + 1]
        else:
            off += 1 + buf[off]
    return end or off + 1

def txt(instance):
    name = f"{instance}._meshcop._udp.local"
    pkt = struct.pack(">6H", 0, 0, 1, 0, 0, 0) + qname(name) + struct.pack(">HH", 16, 0x8001)
    s = socket.socket(socket.AF_INET, socket.SOCK_DGRAM)
    s.settimeout(0.5)
    deadline = time.time() + 3
    while time.time() < deadline:
        s.sendto(pkt, ("224.0.0.251", 5353))
        try:
            buf, _ = s.recvfrom(9000)
        except socket.timeout:
            continue
        counts = struct.unpack(">6H", buf[:12])
        off = 12
        for _ in range(counts[2]):
            off = read_name(buf, off) + 4
        for _ in range(sum(counts[3:])):
            off = read_name(buf, off)
            rtype, _, _, rlen = struct.unpack(">HHIH", buf[off:off + 10])
            rdata = buf[off + 10:off + 10 + rlen]
            off += 10 + rlen
            if rtype == 16 and b"xp=" in rdata:
                kv, i = {}, 0
                while i < len(rdata):
                    k, _, v = rdata[i + 1:i + 1 + rdata[i]].partition(b"=")
                    kv[k.decode()] = v
                    i += 1 + rdata[i]
                return kv

for inst in sys.argv[1:]:
    kv = txt(inst) or {}
    print(inst)
    for k in ("nn", "xp", "pt", "sb", "omr", "at", "tv", "vn", "mn"):
        if k in kv:
            v = kv[k]
            if k in ("nn", "tv", "vn", "mn"):
                v = v.decode(errors="replace")
            elif k == "omr":
                v = f"{v[1:].hex()} /{v[0]}"
            elif k in ("pt", "sb"):
                v = f"{int.from_bytes(v, 'big')} (0x{v.hex()})"
            else:
                v = v.hex()
            print(f"  {k} = {v}")
the instance names are the ones dns-sd -B lists.
what each border router publishes
from the network data. on the ESP's USB console:
each entry includes the Rloc16, in hex, of the router that published it (a400
is router 41, 3800 router 14). ::/0 is a default route, a route with n in
its flags is a NAT64 prefix, service 5d is an SRP server and service 01 is a
backbone router. ot bbr names the primary.
mine, since the failover:
| add-on | ESP | |
|---|---|---|
| default route off the mesh | yes | yes |
| SRP server, where Thread devices register | yes | yes |
| routable (OMR) prefix | uses the ESP's | publishes it |
| backbone router | standby | primary |
| NAT64 prefix | no | yes |
one border router at a time holds the prefix and the primary backbone router. before the failover the add-on had both, and they did not move back when it returned. a border router only publishes its own prefix when the network has none, or only a lower preference one, so every router ends up on one prefix with no setting.
Thread devices reach IPv4 only addresses through the ESP either way.
watching a failover
what happens when the add-on goes away, watched over the ESP's REST API, no USB.
- turn the automation off, then stop the add-on
-
watch the routers' addresses and the ESP's own
curl -s http://esp-ot-br-33f0.local/diagnostics | jq -c '.[] | {router: (.Rloc16 / 1024 | floor), addresses: .IP6AddressList}' curl -s http://esp-ot-br-33f0.local/ipaddr | jq -c '.result[] | {address, preferred}'- an address ending
0:ff:fe00:fc38is the primary backbone router's,fc00the leader's,fc10upwards are services - an address outside the mesh-local prefix and
fe80::is in the routable prefix "preferred": falseis a deprecated address. the web UI dashboard shows the same list- in mDNS, bit 8 of
sbis set on the primary backbone router, see mDNS
- an address ending
-
turn the automation back on. it starts the add-on again
what mine did:
| after stopping the add-on | |
|---|---|
| about 5 minutes | the add-on's router dropped out. the ESP became primary backbone router and published its own prefix |
| straight after | addresses in the old prefix deprecated |
| 5 minutes later | those addresses removed, OpenThread's default is 300 seconds |
| automation back on | the add-on rejoined as the same router, standby, on the ESP's prefix |
troubleshooting
| symptom | cause |
|---|---|
| add-on stopped after the pi was off, with Watchdog on | the 10 restarts in 30 minutes were used up. the automation starts it again |
No route to host in the add-on log |
the pi is unreachable. Connection refused means ser2net is not running |
a freshly flashed board sits on its own ESP-BR-xxxx network |
expected, it forms one when it has no dataset. move it onto yours |
| the ESP stays a child | its dataset differs from the network's. check the mesh-local prefix |
| the panel shows 2 border routers, the ESP's topology shows 3 routers | routers and border routers are different things, see above |
| the ESP still has the prefix and primary backbone router after the add-on came back | expected, they do not move back. see watching a failover |
| an Amazon network under Other networks | the Echo's own network. it cannot join this one |